Friday, March 23, 2007

Heavy Construction & Machinery

Used Heavy Equipment and Machinery; Construction, Utility and Landscaping Vehicles

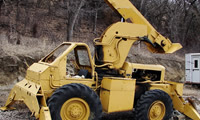
We have established a new section on our website dedicated to Heavy Equipment & Machinery listings. The listings include many trucks as well as heavy machinery (such as 2 fifth wheel equipped semi-trucks or a crane).

There are construction vehicles such as an Eric truck crane, road service trucks such as an Oshkosh snow plow, utility trucks such as three white 1988 Chevrolet utility trucks, and landscaping truck, such as a 66 inch tree spade truck.

Thumbnail Samples of the Equipment/Machinery Listings you will Find:
Three White 1988 Chevrolet Utility Trucks48 Foot Container Trailer
Austin-Western CraneFord Crew Cab Platform Lift Utility Truck
1979 OshKosh Snow Plow Truck and Dump TruckExcavator Bucket
Gehl Forklift on 20 Ton TrailerGrapple Bucket
The owners of Syd's Eastside Auto Salvage, Inc., and Feimer Construction Company, Inc., are selling this heavy equipment, machinery and construction vehicles on behalf of Fejfar Construction & Equipment.

Currently, we are concentrating on getting photographs of this heavy equipment and machinery online so that interested parties can view the equipment, machinery and vehicles easily. The above thumbnails are merely a small sampling of what is available at the website. As of this writing, there are twenty-one listings, and we still have more photos to take and put online.

Later, we will add more detailed textual descriptions for the listings and then start listing them in on/off-line industry publications and other construction sales oriented websites.

We hope that you may find something that may be of interest to you. If you need more information, please contact us. We would be happy to take more and better photos of any of the heavy equipment, machinery or vehicles that you may be interested in. We are available online through our Contact Form, or you may call us at 1-605-665-5119 or 1-800-505-5119.

Link:
Heavy Equipment & Machinery
»»  READMORE...

Tuesday, February 13, 2007

Body Work: Fix your dents!

Here is a great body work video from Hot Rod TV. They take an old Mustang and throughout the 10 minute video you learn the exact process to pull out a dent, make it smooth and have it ready for paint.

The video highlights:

1) Sanding down the paint to the bare metal to begin pulling the dent
2) Using the dent puller to attach pins and pull out the dent
3) cutting and grinding off the dent puller pins
4) Mixing body filler using the hardener to properly set the body filler
5) Applying the body filler over the dented spot that was pulled
6) Sanding the excess body filler smooth
7) Hand cross-sanding of the body filler
8) Applying primer to the body work area to give an idea how it will be ready for painting later on


Enjoy and hope it can help you pull your own dents and make a car body work repair!

Regards, MK
Visit our sister blog, the Car Buyer Guide.
»»  READMORE...

Wednesday, January 10, 2007

Custom Painted Taillights

Custom body work on a car will make your car stand out from another car. Today's project shows a method to do some custom work to get custom painted taillights.

I bought an extra set of 94-97 Integra taillights (with the orange turn signal) for $25, in order to try and make something unique. Here is what it looks like:

94-97 Integra Tail light

First step I wanted to do in making it custom was removing the orange turn signal and making it look more like the 98+ integra taillights. Here is what the 98+ taillights look like:

98 Integra Tail light

The process to red out your taillights can be done either using paint or vinyl. My first attempt was using the Krylon Stained Glass red paint. I masked off everything so only the orange was exposed. I don't have a picture of this but the idea is to put masking tape and newspaper surrounding the orange so you only paint over the orange.

This was the final product of the tail light red out process:

Integra Tail light Red Out Picture 1
Integra Tail light Red Out Picture 2

Now, from this part I was going to proceed to painting a green trim on the taillights, but decided to try using vinyl on the taillight to see what difference that would make in the look of the red out taillight. I used acetone paint stripper to remove the krylon paint from my taillights to reexpose the orange blinker. I then got a transparent red vinyl sheet and cut out the vinyl to match the shape of the orange blinker. I have no pictures of this process, but u basically wet the taillight slightly where you will apply the vinyl to give you some leeway in putting it down and then put the vinyl on and squeegee the excess water out making sure you get it all out completely. I also used a hair dryer to make the vinyl stick better and form around the corner of the taillight.

At this point I was satisfied with the way the vinyl red out looked on the taillights and proceeded to set up to paint my taillights with a green trim.

I masked all the parts that were to light up with newspaper and masking tape. Once the taillight was masked, I sprayed three thin coats of green paint onto the taillight, leaving about 5 mins between coats. After my last coat, I left it to dry for about 20 minutes and then proceeded with the clear coat on the taillights. Here are some pictures with the taillight masked and the green painted on top of it:

Integra Tail light Masked and Painted Green 1
Integra Tail light Masked and Painted Green 2
Integra Tail light Masked and Painted Green 3

In this picture I highlight the parts I masked:

Integra Tail light Masked Areas

Once I was done spraying the lights, I let them dry and then removed the masked newspaper and tape to reveal my newly complete Green Custom Painted Taillights. I then installed them onto the car and here are the results:

Completed Custom Green Integra Tail light Picture 1
Completed Custom Green Integra Tail light Picture 2
Completed Custom Green Integra Tail light Picture 3
Completed Custom Green Integra Tail light Picture 4
Completed Custom Green Integra Tail light Picture 5
Completed Custom Green Integra Tail light Picture 6

I was quite happy with the paint match and how it gave a unique look to the car. Hope my adventure into creating my custom painted taillights will make you think about how you can customize your ride and its taillights!

Regards, MK
Cheap domain name registration available for your Car Body work blog available at Domains at Retail!
»»  READMORE...

Saturday, December 9, 2006

Painted Rims Installed on Car

A follow up to my DIY Paint your car Rims article, I promised pics of the rims on my Integra to see how it will look.

Well I had installed them last week as winter has come and some snow has already been seen. Nothing to use my winter tires for yet, but that will come.

I was pretty impressed with how the gunmetal rim with polished style lip looked on my green Integra. I always was going back and forth if I should paint my rims gunmetal, but now I am quite happy with the end result.

Take a look:

Painted Rims on Car 1
Painted Rims on Car 2
Painted Rims on Car 3
Painted Rims on Car 4
Painted Rims on Car 5

Hope my DIY paint your rims article helped, and I hope this will help others picture what the stock SE rims will look like gunmetal with a polished lip and on a green integra like mine.

Regards, MK
Visit my Car Detailing Guide in my other blog. Updates to come real soon.
»»  READMORE...

Wednesday, December 6, 2006

Classic Car Restoration: 1969 Ford Mustang

Looking for some car body work videos and restoration projects I came across this video on YouTube.

a 1969 Ford Mustang was taken from a pretty beat up shape to a fantastic blue painted Mustang that is ready to rule the roads! Take a look at that automatic launch at the end of the video. The amazing part I found was the wiring by the steering wheel and how the interior looked before and after. You can see during the video how the body of the Mustang has been sanded and prepped for painting. The light colored grey primer was put on the outside of the car, and then the final top coat of blue makes it shine. Take a look at this beauty:

»»  READMORE...
 
Privacy Policy